Friday, October 31, 2014

System Center Operations Manager 2012 - Installing Certificates on an Agent


In order to monitor servers not in a trusted domain, System Center Operations Manager uses certificates to authenticate agent communication.  Therefore, you'll need a certificate authority server to submit the certificate request and then download the certificate. You can use either a domain Certificate Authority (CA) server or a standalone CA if your environment already has that in place.  I used a standalone.

Requirements
Certificate Authority Server
Port 5723 open from Server01 to the Management Server


  1. Create the request *.inf file.
  2. From the command prompt (server01) create the request file. *Must be done on the computer the certificate is for

    certreq -new -f server01.inf server01.req
  3. Copy the request file to the CA server and submit request file

    certreq -submit -f server01.req
    1. Click OK to the dialogue box that pops up.
    2. Take note of the RequestId
  4. On the CA Server - launch the Certificate Authority MMC (certsrv.msc) - Select Pending Requests, right-click the certificate request with the RequestId from the previous step select All Tasks - Issue
  5. Retrieve the certificate (CA Server)

    certreq -retrieve -f 4 server01.cer
    1. Click OK
    2. Copy the certificate file (server01.cer) to the server you are installing the agent on (server01)
  6. On Server01 - Install the certificate in the Local Computer - Personal Certificate store
  7. On Server01 - Export the certificate you just imported with the Private Key (server01-exported.pfx)
  8. Retrieve the CA certificate - This certificate will need to be installed in the Trusted Root Certification Authorities store on the Agent computer (server01)
    1. On the CA Server navigate to http://localhost/certsrv/
    2. Click on Download a CA certificate, certificate chain, or CRL
    3. Click on Download CA certificate
    4. Save this file (cacert.cer) and copy it over to the server the agent will be installed on (server01)
  9. On Server01 - Install the CA Certificate in the Trusted Root Certification Authorities
    1. Launch an MMC console and add the Certificates snap-in| for the local computer
    2. Right-click the Certificates folder under Trusted Root Certification Authorities select All Tasks -> Import
    3. Browse to the CA certificate saved from the previous step (cacert.cer)
    4. Click on Next, Next, and Finish
  10. Install the System Center Operations Manager Agent
    1. The files can be found on the Management folder
      C:\Program Files\Microsoft System Center 2012 R2\Operations Manager\Server\AgentManagement\
      64 bit agent - amd64 folder
      32 bit agent - x86 folder
    2. Run the MOMCertImport.exe to import the certificate from step 7

      MOMCertImport.exe server01-exported.pfx
    3. Enter the password set from step 7
    4. If you're updating the certificate run the remove command first

      MOMCertImport.exe /Remove
  11. Restart the Microsoft Monitoring Agent service

Thursday, July 31, 2014

VMware PowerCLI - Creating Standard Virtual Switches and updating VM Network Adapter Labels

In preparation to migrate ESXi hosts from one VMware vCenter 5.0 server to another VMware vCenter 5.5 server, I created this script to automate re-configuring the VM network labels to use a standard vSwitch on each ESXi server.  The script connects to the vCenter server and creates a new standard vSwitch on each ESXi host as well as assigns an available physical uplink (vmnic).  Then also creates the portgroups for each VLAN, and finally updates the VMs network lables in a given cluster.

Download - VM-UpdateVMNetworking.ps1

Wednesday, June 11, 2014

Exchange 2007 Recovery Storage Group Overview

For those of us still running Microsoft Exchange 2007, here is an overview of how to do a mailbox database restore to the Recovery Storage Group.  However, there are two key points that I would like to stress since I did not really find anything that highlighted these points.

The first is that you should not and do not need to have a Recovery Storage Group persistently defined.  It should be created when you need to do a restore and removed as soon as the restore has been completed.  Also there is only one Recovery Storage Group allowed per server.

Secondly, when you do create the recovery storage group you will be asked to select the Storage Group to Link with the Recovery Storage Group.  You'll need to select the Storage Group that the Database being restored was/is located.  This may be obvious to some, but it wasn't to me.

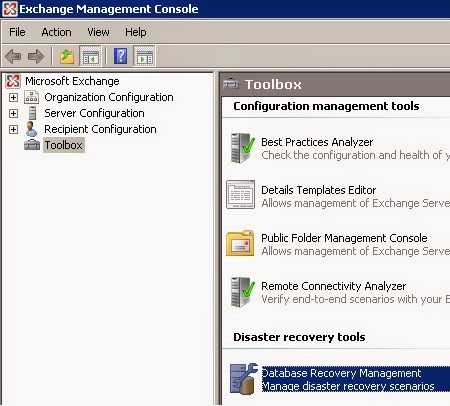
Now, on to Database Recovery Management
  1. Create a recovery storage group (Select the right storage group)
  2. Change the Recovery Storage Group log, system and database paths.  (There should be a drive dedicated to restores, so that production database and log drives aren't affected)
  3. Perform the database restore to the Recovery Storage Group from your backup solution
  4. Verify database and transaction log files (The database may need to be repaired)
  5. Mount the restored database
  6. Restore/recover the mailbox or mailboxes
  7. Dismount the restored database
  8. Remove the Recovery Storage Group
  9. Delete the files and folders associated with the Recovery Storage Group (from step 2)

Monday, June 9, 2014

HP 3PAR StoreServ Commercial by Glove and Boots

This morning started out as a pretty normal day.  I went to the new Chick-fil-A for breakfast, and then proceeded to work.  Then at around 8 am, something that I had never fathomed would happen.  My new favorite video bloggers, Glove and Boots, were hired by Hewlett Packard to do a commercial for their enterprise SAN solution, the HP 3PAR StoreServ!  Simply brilliant!!

Wednesday, May 28, 2014

System Center Operations Manager 2012 Daily Alert Management


    Here's a quick little Operations Manager powershell command that I use pretty much on a daily basis.

    Get-SCOMAlert | Where-Object { ($_.ismonitoralert -like "False") -and ($_.lastmodified -le (get-date).addhours(-24)) -and $_.resolutionstate -ne 255 } | Set-SCOMAlert -ResolutionState 255
    
    So, this basically closes all the open alerts created by alert rules that are older than 24 hours.  Alerts created by alert monitors will close themselves once the condition that triggered them is resolved.

Thursday, May 22, 2014

Windows Server 2012 R2 MPIO DSM for HP EVA P6000

HP recently released a new version of their MPIO full feature DSM for P6x00 EVA, version 4.04 on May 15, 2014. This new version now supports Windows Server 2012 R2 (x64).  You can download the software from the HP Support Center here. http://bit.ly/RaMzfZ

Although, on September 12, 2013 HP has already announced the EVA P6000 end of life.  According to the announcement: http://bit.ly/1m9S0Ho

  • "The EVA P6350 and P6550 systems will no longer be orderable after January 31, 2014."
  • "Customers who have purchased EVA P6350 and P6550 storage systems will be supported until January 31, 2019, 5 years after the obsolescence date."
  • "HP will continue to qualify major new operating system releases (Windows, VMware, Linux, and HP-UX) until January 31, 2015 to ensure HP EVA Storage will run in your environment."

Wednesday, May 7, 2014

Installing Operations Manager 2012 R2 agent fails with error code 80070005

Today, I ran into an issue when trying to install the SCOM 2012 R2 agent on a domain controller running Windows Server 2012 R2.  I found the following technet article which proved useful as it had the error and error code I was getting, but the remediation steps didn't solve my problem.

Troubleshooting Issues When You Use the Discovery Wizard to Install an Agent

Upon further investigation, I could not access the SYSVOL and NETLOGON shares on that specific domain controller from the SCOM management servers running Windows Server 2012 R2.

I remember seeing this sort of issue when accessing shares on a NetApp that we have from a Windows 2012 Server.  So disabling the secure negotiate on the Windows 2012 Server solved that issue.  So I did the same on the SCOM Management Servers which ended up fixing this issue using the following powershell command.

Set-ItemProperty -Path "HKLM:\SYSTEM\CurrentControlSet\Services\LanmanWorkstation\Parameters" RequireSecureNegotiate -Value 0 -Force
 http://support.microsoft.com/kb/2686098

You should also read this which explains Secure Negotiate which is new for SMB3.
http://blogs.msdn.com/b/openspecification/archive/2012/06/28/smb3-secure-dialect-negotiation.aspx